Main Menu |
![]()
|
Help |

-> "New Picture" : creates a new blank picture .
-> "Open Focus Project" : Opens a project that was saved in the Focus file format : this includes all text and image layers .
-> "Open Picture from file" : Opens the "Acquire images" dialog to import a picture.
-> "Save Focus Project" saves the background and all the layers to the Focus file format.
-> "Save Picture to file" : allows user to save the changes done to the picture and exporting to a raster file format such as Jpg , Png , Bmp etc...
-> "Adjust Gamma for ->![]() "
prepare the picture to be exported to one of the following devices : Printer and
Macintosh Screen .
"
prepare the picture to be exported to one of the following devices : Printer and
Macintosh Screen .
-> "Print.." : Shows a Printing preview and then users can send command to Printer .
-> "Close file" : close the current picture.
-> "Options" : customizes some options about the Focus
beahviour
-> "Exit" : Close current file (if any) and exit Focus .

-> "Undo" : allows user to go back a step in the changes done over the picture . Actually , undo can only restore pixels changes , while it doesn't take back when you moved a layer or made a selection (Selections have their own Undo command , while you can drag manually layers to their previous position ) .
-> "Redo" : the opposite of Undo : allows user to go forward a step in the changes done to the picture . ( Selection have their own redo command ) .
-> "Copy" : Makes a copy of the current selection content and creates an "object" with it . The "object" so created can be then 'promoted' to an "image layer" with the command "Paste as new layer" . There are also other ways to create "objects" , like importing from file (see further commands). You can see all the objects you have imported from file by opening the "Objects Window" .
-> "Cut": same as Copy but also cut away from selection its content : when used with Image Layers this command trims parts of the layer giving it a different shape . While used with the background the command simply fill with the white color the content of the selection .
-> "Paste as new layer" : creates an "image layer" from the current object . An other way to create a layer is to choose from the object menu : "Create new layer" .
-> "Crop" : just like the word says : crops the selected part of the current image layer or of the background .
-> "Resize to work Area" : Reduces the size of the current image layer or the background to the Area limited by the work-crop area selection tool .
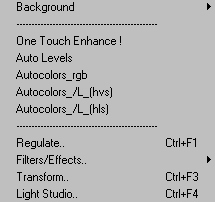
-> "Background" :
![]()
these operations are only performed on the background :
you can : change the size of the background or rotate it by some angle ; you also can "revert" the background to the state of when it was loaded from file and imported in Focus .
-> "One Touch Enhance" : this performs a basic enlightment of the current image layer or background that is of very practical use with under-exposed photos .
-> "Auto levels" : this command contrasts the current image layer or background , to better separate shadows from hilights : if the photo is already well contrasted the command does not much . This command should be one of the first to be executed when importing a new photo in Focus : in some rare cases you could find that the effect produced by this command is slightly more than necessary : in this case you can choose ->Process->Regulate and from the regulation dialog choose histogram stretch or shadows-midlights-highlights functions to adjust the black&white contrast at your own taste.
-> "Auto Colors RGB" : this command try to balance the colors of the current image layer or background in such a way that the picture has no dominance of any colors upon others .This command should be one of the first to be executed when importing a new photo in Focus
-> "Auto Colors /L(HSV)" : the same of auto colors RGB but the Value of each pixel is kept equal to that of the original photo (Preserve Value) .
-> "Auto Colors /L(HLS)" : the same of auto colors RGB but the Luminosity of each pixel is kept equal to that of the original photo (Preserve Luminosity) .
-> "Regulate" :Opens a menu from where you can easily regulate for the current image layer : Brightness , Contrast , Saturation , RGB and CYM channels and so on . Also there is a special function called : "Replace color by gradient" . For more info : "Image Regulation"
-> "Filters/Effects" : Opens a menu where you can apply many special effects to the current image layer .
-> "Transform" : Opens a menu where you can apply some deformations to the current image layer .
-> "Light Studio" : Opens a menu where you can apply some lighting effects to the current image layer .
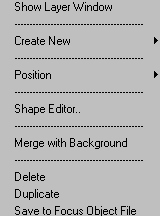
->"Show Layer Window" : shows the window that contains the list of the image layers
->"Create New" : Allows to create a new layer ( blank layer , from the current object or from the current text layer)
->"Position" : Aligns the current image layer to left , rigth , top , down or center
->"Shape editor" : Open the editor for the shapes of layer : here you'll be able to choose the alpha channel for the layer from file or to give a geometric alpha channel or apply several opacity gradient to the alpha channel .
->"Merge with background" : Merges together the current image layer with the background : after the merge the layer is not deleted : you have to delete it if you don't want it anymore .
->"Delete" : dletes the current image layer : this command cannot be undone .
->"Duplicate" : duplicates the current image layer .
->"Save to Focus Object" : save the layer to file using the "focus Object format" .
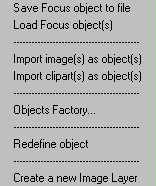
-> "Save Focus object to file" : save to file the current object . Then you can import the same object from file , choosing : "Load Focus object" .
-> "Load Focus object" . : import an object from file .
-> "Import image as object" : Import an image from file turning it to an object .
->"Import clipart as object" : Import an image from file and then convert it to an object using the transparent color of the image to give a shape to the object .
-> "Objects Factory " : You can choose to create some standard objects like a Memo text or a Calendar .
-> "Redefine object" : Enlarge or shrink an object or rotate it by some angle . .
-> "Create a new layer" : This is perhaps the most important function : it allows you to create a copy of the current object and put it on a layer .
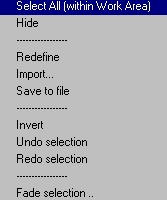
->"Hide".. the current selection .
-> "Redefine"..(enlarge or shrink the current selection) .
-> "Import".. a selection from file : every file loaded will be seen like a possible selection .
->"Save to file" : save current selection to a file .
-> "Undo selection" :Reload the previous selection .
-> "Redo selection" : Load the next selection .
-> "Fade selection" : creates a faded selection .

-> "Text Layers" : display the layers window at the text layers page . For more info about layers see the "Layers" section of this Help .
 |
You can control the parameters of each "Text Layer" from this window : You can edit the text every time you need , and also adjust the text width and height , color and transparence : Use the "Effects" button to add a special effect to the text .... |
-> "Image Layers" : display the layers window at the image layers page . For more info about layers see the "Layers" section of this Help .
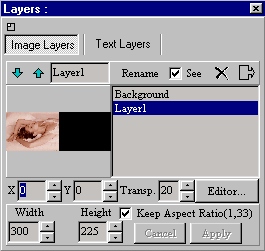 |
You can control the parameters of each "Image Layer" from this window : You can adjust the position of the layer ,pixel by pixel (use the move layer tool to move more quickly instead) , you can change the width and height , as well as the transparence : Use the "Editor" button to perform operations on the shape (alpha channel or mask) of the layer .
|
-> "Tools Window" : shows the tools window :
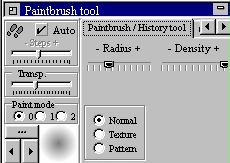
-> "Textures window" : shows the texture window where you can choose a texture to use with some painting tools or some effects .

-> "Gradients window" : shows the gradients window where you can choose a multicolor gradient to use with some painting tools or some special effects ;
